
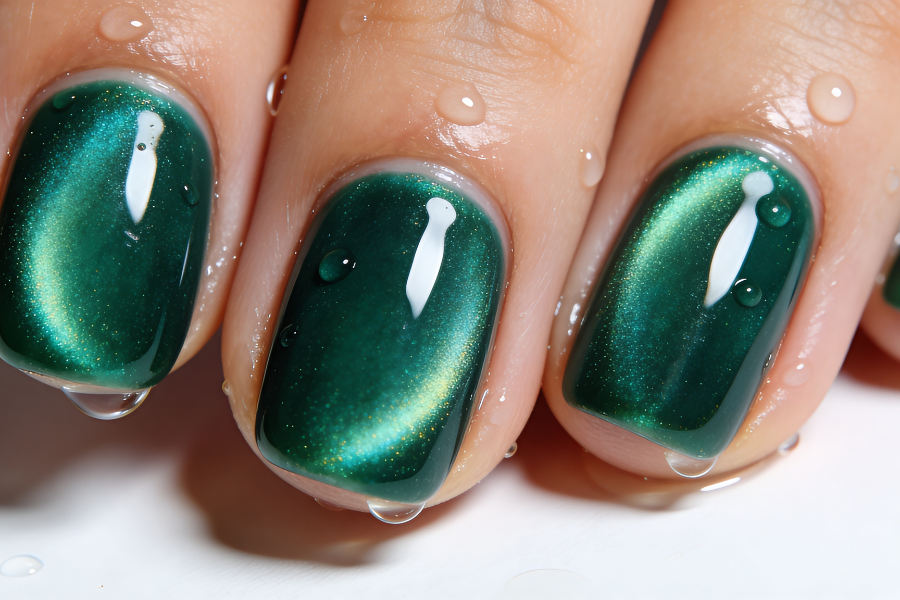

Cat eye nails are the newest obsession in the nail industry. So understanding the techniques on how to make cat eye nails is totally worth it. This blog shares about what the cat eye nails are, how to achieve them and everything you need to know.
What Are Cat Eye Nails
Cat eye nails are a form of nail art that uses a nail gel containing small magnetic particles. Before the gel is cured, a magnet is used to move the particles and form creative patterns. These patterns shine with the movement of light.
Cat eye nails give off a beautiful play of light which adds depth to your simple nail art. The cat eye nails effect is achieved using different types of magnets to move and position the magnetic particles in the nail gel and create reflective patterns. Creating the perfect cat eye nails requires concentration and precision.
Why Is It Called Cat Eye Nails
Cat eye nails trend has flooded all social channels and captivated nail enthusiast hearts.
But why is it called a cat eye?
The name is inspired by the shiny irises of a cat. The shimmery appearance of light reflecting off of the carefully shaped magnetic particles resembles the slitted eyes of a cat.
How To Do Cat Eye Nails
This is the sequence of how to do cat eye nails step by step, that you should follow for salon like results.

Step 1: Prep The Nails
To make cat eye nails, you need to first start with prepping your nails. Cut and file your nails, push back your nail cuticle, buff your nail surface and clean it thoroughly to create a smooth base for the nail gel to sit on. Apply a base coat and base color, then cure it before moving on to the next step.
Step 2: Apply The Magnetic Gel Polish
Apply the magnetic nail gel in a thin and even layer, one nail at a time. Shake the product before you use it because the magnetic particles tend to settle at the bottom. Don’t cure the nail gel yet or light it dry off. Immediately start to shape the cat eye pattern you want with a magnet.
Step 3: Use The Magnet To Shape The Particles
As soon as you have applied the magnetic nail gel, hold a magnet over it without touching the nail gel, around 3 to 5 mm away. Hover it over the nail gel for 5 to 10 seconds and then move it to create your desired pattern. There are many cat eye nail designs that can be done using different techniques.
Step 4: Cure The Magnetic Nail Gel
Once you have achieved the pattern you want, cure the gel carefully. You need to work on steps 2 to 4 on one nail at a time because if the nail gel is left uncured for long, it’ll soften and the results may not be as expected.
Step 5: Finish With A Top Coat
Once all your nails are done, add a layer of top coat to protect and seal the cat eye nail pattern and also add some shine.
What Are The Essential Tools Needed For Cat Eye Nails

It might feel like you need a lot of tools and products to create elegant cat eye nails but you only need a few essentials.
- Base coat – to create an even surface for a smooth application of the magnetic nail gel.
- Base color – you can use a similar or darker-toned nail polish as the base to add richness.
- Cat eye gel polish – choose your choice of gel polish for the cat eye nails.
- Magnet – get your choice of magnet depending on the pattern that you want.
- UV/LED lamp – to cure at each step for perfect results.
- Top coat – to add a protective layer and add shine to nails.
What Types Of Magnet Are Used For Cat Eye Nails
Cylinder Wand
A small cylinder magnet is the most versatile for creating many cat eye patterns. Using a cylindrical magnet, you can achieve the wide cat eye pattern. Hold the magnet on both sides of your nail till all the particles are evenly distributed. You can also create an ombre effect by using the magnet to attract the particles from the cuticles to the tip.
Rectangle Magnet
A rectangle magnet creates similar patterns as a cylinder one. The benefit of a rectangle magnet is that it offers a stronger grip and control. Since it is less likely to slip out of your hands, it is a good choice for beginner nail artists. You can create a French tip cat eye pattern by holding a rectangle magnet vertically over your nail and moving it upwards.
Creative Shapes
Cat eye nails trend has moved past just simple lines and now nail artists can create intricate patterns using inventive magnets. A rectangle magnet is attached with a uniquely shaped metal that draws the magnetic particles into the desired effect. Examples for this include a twisted wire in a V shape that creates a heart shaped cat eye pattern and a scissor-like metal extension to create a French tip.
Conclusion
Cat eye nails is a trend that offers premium results and learning it is much worth the effort. Cat eye nails are a service that clients are interested in so understanding the techniques on how to use magnets for cat eye nails is beneficial.
FAQs
How long do cat eye nails last?
Cat eye nails last up to 2 to 3 weeks with proper maintenance and care. The magnetic pattern itself doesn’t fade or chip, rather it depends on the overlay or extension underneath.
Do you use the magnet before or after curing cat eye gel?
For cat eye nails, the magnet is used after applying the magnetic gel and before curing it. The magnet is used to move and define the magnetic particles into a specific pattern. Curing the nail gel locks the pattern in place.
How long should you hold a magnet over cat eye gel?
Immediately after applying the magnetic nail gel, hold the magnet 3 to 5 mm over it for about 5 to 10 seconds. Hold the magnet still to perfectly draw the particles into the desired design.
Why did my design blur after curing cat eye nails?
Cat eye nails may look blurry after curing if there is too much time between using the magnet and curing it. Another reason for your cat eye nails to look blurry can be that the magnetic particles weren’t activated properly.